
How to Choose Ultrasonic Welding Parameters: Expert Guide
Publish Data:2025.12.22 Author: Hyusonic
If you work with ultrasonic welding, you already know one thing: your welds live or die by the parameters you choose.
Get your amplitude, pressure, and weld time wrong, and you’ll see it immediately on the line—flash, weak welds, inconsistent strength, or parts that simply won’t bond. Dial in the right combination of energy, trigger force, downspeed, and hold time, and suddenly your process is stable, your scrap drops, and your quality reports get very quiet.
The challenge? Most manuals give you ranges, not answers. They don’t tell you how to choose ultrasonic welding parameters for your specific material, joint design, and machine. They don’t explain when to switch from time mode to energy or distance mode, how booster gain really affects weld strength, or why the same setting behaves differently at 20 kHz and 35 kHz.
This guide is written from the perspective of engineers who’ve actually debugged real production lines—burned parts, cold welds, mystery failures and all—using modern generators and presses like those from HYUSONIC.
You’re going to see exactly how each core parameter affects weld quality, how to pick safe starting points for common plastics and metals, and a simple, repeatable method to optimize your setup without burning through hundreds of parts.
If you want to stop guessing and start setting ultrasonic welding parameters with confidence on the first try, keep reading.
The 7 Core Ultrasonic Welding Parameters You Must Control
If you want stable weld strength and short cycle time, you must control seven core ultrasonic welding parameters. When I set up a new HYUSONIC line, I start with these first, before touching anything else in the ultrasonic welding parameters chart.
Core Parameters Overview
Amplitude (µm or %)
This is your primary heat input. The amplitude setting in ultrasonic welding controls how fast the interface melts. Higher amplitude = faster melt and higher temperature, but also higher risk of flash and part damage.Weld Time / Energy / Distance Mode
You choose how the weld ends:- Time mode: stops after a fixed time.
- Energy mode: stops after a target energy.
- Distance mode (collapse/absolute): stops after a target collapse or position.
This choice determines consistency and how the process reacts to part variation.
Pressure / Force at the Weld Interface
Often called horn pressure in ultrasonic welding. Too low and parts don’t couple; too high and you squeeze out molten material and mark the surface. Force (N) or pressure (bar) directly affects internal bonding and flash.Trigger Force / Trigger by Power
Trigger force in ultrasonic welding defines when the generator turns on ultrasonics. If it’s too low, you vibrate in the air; too high and you deform parts before melting. Power-based trigger is useful when parts or heights vary.Downspeed (Approach Speed)
Downspeed controls how fast the horn approaches and collapses the joint. Slow downspeed improves alignment and cosmetics; fast downspeed shortens cycle time but risks impact marks and unstable collapse.Hold Time and Hold Force
After ultrasonics stop, you keep force on the part. Downspeed and hold time work together: the hold phase lets the molten interface solidify under pressure, controlling shrinkage, stress, and final weld strength.Booster and Horn Selection (Gain)
Booster gain and horn amplitude define the real amplitude at the joint. A 1:2 booster and high-gain horn will multiply generator amplitude, which is powerful but can narrow your process window if you overshoot.
Quick Reference Table
| Parameter | Typical Unit | Main Effect on Weld |
|---|---|---|
| Amplitude | µm or % | Melt rate, interface temperature |
| Time / Energy / Distance Mode | s, J, mm | Consistency, compensation for variation |
| Pressure / Force | bar, N | Coupling, flash, internal bonding strength |
| Trigger Force / Power Trigger | N, W | Start point, alignment, repeatability |
| Downspeed | mm/s | Collapse behavior, impact, cosmetic quality |
| Hold Time and Hold Force | s, N | Solidification, stress, final strength |
| Booster & Horn Gain | Ratio (e.g. 1:2) | Delivered amplitude at the weld interface |
These seven levers are the core ultrasonic weld strength factors. Once you control them, you can systematically optimize the ultrasonic welding process instead of guessing.
How Each Ultrasonic Welding Parameter Affects Weld Quality
When we set up a weld, every parameter either builds strength and consistency—or creates defects. Here’s how the main ultrasonic welding settings actually change melt behavior, appearance, and weld strength in real production.
Amplitude, Melt Rate, and Strength
- The amplitude setting in ultrasonic welding is your main “heat” control. Higher amplitude = faster melt rate, higher interface temperature, more flash risk.
- Too high amplitude: melt overflow, part marking, internal voids, and sometimes a surprisingly weak, over‑worked weld.
- Too low amplitude: cold weld, non‑stick, poor molecular diffusion, especially on tougher plastics like PC or PA6.
- Dial amplitude to get a quick, controlled melt and a compact weld zone—this is one of the biggest ultrasonic weld strength factors and ties directly to the real µm delivered at the joint.
Time, Energy Mode, and Distance Mode
- Weld‑by‑time is simple and fast but more sensitive to part and material variation.
- Energy mode vs time mode in ultrasonic welding: energy mode keeps the total energy consistent, which usually boosts strength consistency and compensates for small fit or moisture changes.
- Weld by distance (collapse or absolute) locks in actual part movement, improving dimensional control and reducing scrap on tight‑tolerance assemblies.
- Longer weld times or higher energy: more melt and flash, more risk of over‑welding; too short: under‑welded joints that fail early.
Pressure / Force at the Horn
- Horn pressure in ultrasonic welding controls contact, friction, and internal bonding.
- Too high pressure/force: choked vibration, high flash, squeezed‑out melt, crushed features, and sometimes weak welds because the melt can’t flow and bond.
- Too low pressure/force: poor coupling, intermittent vibration, uneven melt, and classic non‑stick or “kiss” welds.
Trigger Force and Start of Vibration
- Trigger force in ultrasonic welding decides when the generator fires.
- Too high trigger: parts are already deflecting before ultrasonics start, causing misalignment and inconsistent collapse.
- Too low trigger: vibration starts in the air or with poor contact, which hurts repeatability and can mark delicate surfaces.
- A stable trigger force gives you the same start condition every cycle, which is critical for consistent weld time vs pressure interaction.
Downspeed, Collapse, and Cosmetics
- Downspeed controls how fast the horn approaches and collapses the joint.
- Too fast: horn slam, impact marks, cracked or stressed walls, and over‑collapse.
- Too slow: extra cycle time, unnecessary heat soak, and sometimes uneven collapse on tall or multi‑rib parts.
- Proper downspeed gives smooth collapse, better cosmetic quality, and fewer tooling marks.
Hold Time and Hold Force
- Hold time and hold force keep pressure on the joint while the molten plastic shrinks and solidifies.
- Too short hold time or low hold force: shrink voids, internal stress, and reduced strength.
- Too long or too high: crushed details, stress whitening, and visible part distortion.
- Get this right and you lock in a dense, stable weld that passes pull, leak, and burst tests; you can see the difference clearly in cross‑sections and in measured weld strength, as we show in our ultrasonic weld strength guide.
Booster Gain, Horn Design, and Real Amplitude
- Booster gain and horn design set the actual amplitude at the joint, not just the percentage you see on the generator.
- A high‑gain booster + aggressive horn can push amplitude into a range where melt overflow, flashing, and part marking show up fast.
- Too low gain: not enough energy at the interface, leading to incomplete fusion, especially on rigid or glass‑filled materials.
- Matching booster ratio and horn design to the material and joint keeps the optimizing ultrasonic welding process straightforward and gives you a wider, more forgiving process window.
Step-by-Step: How To Choose Ultrasonic Welding Parameters (HYUSONIC Method)
I follow a simple, repeatable method so your team can dial in ultrasonic welding parameters fast and keep them stable in production.
1) Define Material And Joint First
Before touching any setting, lock in:
- Material pair (PP, ABS, PC, PA6, metals, etc.)
- Joint design (energy director, shear joint, tongue-and-groove, overlap for metals)
- Target weld strength and cosmetic limits
This is the foundation for every amplitude, pressure, and time decision you make.
2) Select Ultrasonic Frequency (15–40 kHz)
Match frequency to part size and stiffness:
- 15–20 kHz: Larger, more robust plastic parts or thicker metal stacks
- 30–40 kHz: Small, delicate, or cosmetic plastic parts
- Stiffer materials or metal tabs: Prefer lower frequency with higher power
Modern HYUSONIC ultrasonic plastic welders let you swap tooling and keep the same control logic across 20 kHz and 35 kHz systems.
3) Choose Initial Amplitude Setting
Set your starting amplitude like this:
- Most thermoplastics: 70–100% of system amplitude capability
- Tough / filled plastics or metal: Start high, then back off if you see flash or damage
- Thin, cosmetic parts: Start lower, use ramped or stepped amplitude if needed
This gives enough interface heat without instantly over-welding.
4) Set Trigger Force (Or Trigger By Power)
Trigger force in ultrasonic welding controls when vibration starts:
- Start at about 30–50% of planned weld force
- Just enough to seat the parts and align the joint
- Avoid too high trigger force (causes pre-crushing and inconsistent melt)
On high-tolerance parts, I’ll use dynamic trigger force or trigger-by-power to compensate for part height variation.
5) Build A Simple DOE (3 × 3 Matrix)
To truly optimize the ultrasonic welding process, don’t guess—run a small DOE:
- Vary amplitude, time/energy, and pressure at 3 levels each
- Compare energy mode vs time mode ultrasonic control for consistency
- Keep all other parameters fixed (fixture, horn, downspeed, hold time)
This maps the interaction of weld time vs pressure and amplitude on strength and cosmetics.
6) Measure Weld Strength And Internal Quality
For each DOE point:
- Measure weld shear strength (or peel, tension—whatever reflects real use)
- Cut and inspect cross-sections for voids, cold weld, or over-melt
- Record ultrasonic weld strength factors: collapse, actual energy, and peak power
If you weld metals (battery tabs, wire terminations), pair this with resistance checks and visual bonding quality from our HYUSONIC ultrasonic metal welders.
7) Fine-Tune With Energy Or Distance Mode
Once the “good” zone is clear:
- Switch from pure time mode to energy mode or weld by distance ultrasonic welding (absolute or collapse distance)
- Use distance mode for tighter dimensional control and less part-to-part variation
- Use energy mode for stable heat input when part fit or material lots vary
This step usually gives the biggest jump in Cp/Cpk.
8) Validate With A 100-Piece Robustness Test
Lock in your final parameter window:
- Run at least 100 consecutive parts at nominal settings
- Confirm all parts meet strength and cosmetic specs
- Calculate Cp/Cpk for key outputs (strength, collapse distance, energy)
- Store the final “recipe” with hard upper/lower limits for amplitude, pressure, time/energy, trigger force, and downspeed
This is how I turn a good lab weld into a stable production process with traceable ultrasonic welding settings.
Quick HYUSONIC Setup Table
| Step | Parameter | Typical Starting Point |
|---|---|---|
| 1 | Frequency | 20 kHz (general plastics), 35 kHz (small/cosmetic) |
| 2 | Amplitude setting ultrasonic | 70–100% for most plastics, higher for tough parts |
| 3 | Trigger force ultrasonic welding | 30–50% of planned weld force |
| 4 | Weld control mode | Start in time mode, then move to energy/distance |
| 5 | DOE matrix | 3 levels each: amplitude, time/energy, pressure |
| 6 | Validation run | 100 pcs, confirm Cp/Cpk and visual/cut quality |
Ready-to-Use Ultrasonic Welding Parameter Charts for Plastics and Metals
You don’t need perfect numbers on day one—you need safe, proven starting points. Below is a practical ultrasonic welding parameters chart you can use as a baseline and then dial in for your own horn, fixture, and parts.
Typical Starting Parameters for Common Plastics
These are typical starting amplitude settings, weld time, and pressure for 20 kHz systems. Always confirm against your material datasheet and part limits.
| Material | Type | Amplitude at Horn (µm) | Weld Time (ms) | Weld Pressure (bar) | Notes |
|---|---|---|---|---|---|
| PP | Semi-crystalline | 40 – 60 | 300 – 800 | 2.5 – 4.0 | Needs higher energy, watch for flash |
| ABS | Amorphous | 30 – 45 | 250 – 600 | 2.0 – 3.5 | Easy to weld, good cosmetics |
| PC | Amorphous | 30 – 45 | 300 – 700 | 2.5 – 4.0 | Sensitive to stress/marking |
| PA6 | Semi-crystalline | 40 – 60 | 350 – 900 | 3.0 – 4.5 | Hygroscopic, condition parts if possible |
| PBT | Semi-crystalline | 40 – 60 | 300 – 800 | 2.5 – 4.0 | Use energy mode for consistency |
| PET | Semi-crystalline | 45 – 65 | 400 – 900 | 3.0 – 4.5 | Narrow window, needs tight control |
Use this as a starting map, then tune weld time vs pressure to hit strength and appearance targets.
Semi-Crystalline vs Amorphous Settings
Semi-crystalline plastics (PP, PA, PBT, PET) typically need more power than amorphous materials (ABS, PC). That shows up in your amplitude and energy mode settings:
| Property | Semi-Crystalline (PP, PA6…) | Amorphous (ABS, PC…) |
|---|---|---|
| Amplitude setting | Medium–High (40–65 µm) | Low–Medium (30–45 µm) |
| Typical weld time | Longer (350–900 ms) | Shorter (250–700 ms) |
| Energy input | Higher, tight window | Moderate, wider window |
| Defect risk | Cold weld if energy too low | Over-weld/marking if too high |
When in doubt with semi-crystalline resins, start slightly higher on amplitude and use energy mode to keep welds consistent, then trim time back for cycle time.
Guideline Settings for Ultrasonic Metal Welding
For copper, aluminum, and mixed Cu–Al welds (battery tabs, wire terminations, busbars), the parameter window is very different from plastics:
| Application | Frequency | Amplitude (µm) | Weld Time (ms) | Weld Force (N) | Notes |
|---|---|---|---|---|---|
| Cu–Cu battery tabs | 20 kHz | 25 – 40 | 150 – 400 | 800 – 2500 | Time mode plus max power monitoring |
| Al–Al busbars | 20 kHz | 30 – 45 | 200 – 600 | 1500 – 4000 | Higher force, rigid fixturing |
| Cu–Al mixed joints | 20 kHz | 25 – 40 | 200 – 500 | 1000 – 3000 | Carefully optimize to avoid intermetallics |
| Wire splices (Cu stranded) | 20 kHz | 20 – 35 | 150 – 350 | 500 – 2000 | Control collapse distance for quality |
For these applications, we almost always run weld-by-time with strict limits on power and collapse. Our production-focused IQ-series ultrasonic metal welding machines are built around this type of control.
20 kHz vs 35 kHz Ultrasonic Welding Systems
Frequency affects amplitude, noise, and what size parts you can weld. You can’t copy/paste a parameter set between 20 kHz and 35 kHz.
| Feature | 20 kHz System | 35 kHz System |
|---|---|---|
| Typical amplitude at horn | 30 – 60 µm | 15 – 35 µm |
| Best for part size | Medium–large housings, big ribs | Small, delicate, tight features |
| Noise level | Higher | Lower |
| Time vs energy mode use | Both, very common | Often energy or distance mode |
| Typical joint types | Energy directors, shear joints | Micro-features, tight cosmetics |
If you move a tool from 20 kHz to 35 kHz, reduce amplitude and weld time, and re-validate using energy mode or distance mode, not just time mode.
How to Read and Adapt Ultrasonic Welding Parameter Charts
Use any ultrasonic welding parameters chart as a starting recipe, not a final answer:
Match material and frequency first
Pick the row that matches your plastic (PP, ABS, PC, etc.) or metal (Cu, Al, Cu–Al) and the actual frequency of your stack (20 kHz vs 35 kHz).Convert amplitude percent to microns
If your generator shows amplitude in %, multiply by the stack’s max amplitude to get real µm at the horn. Then consider booster gain and horn amplitude before comparing to charts.Adjust for horn and fixture
- Soft or small horns may deliver less real amplitude → bump amplitude %, time, or pressure.
- Very rigid fixtures may transmit more energy → keep amplitude lower and tighten time/energy limits.
Compensate for joint design
- Sharp energy director or shear joint: start at the low end of amplitude and time.
- Flat joint or poor fit: start mid–high amplitude and plan to use energy mode.
Fine-tune for your line
Use the chart values as your first shot, then run short trials and tweak:- Increase amplitude or time if you see cold welds, low strength, or incomplete collapse.
- Reduce amplitude, pressure, or time if you see melt overflow, flash, or heavy horn marking.
Done right, these charts let you move from guesswork to a structured, fast setup—then you can focus on optimizing ultrasonic weld strength factors, not firefighting.
Plastic vs Metal Ultrasonic Welding Parameters
When you look at How To Choose Ultrasonic Welding Parameters, plastics and metals behave very differently. If you set them up the same, you’ll fight weak welds, tool damage, or scrap.
Plastic vs metal: quick parameter comparison
| Parameter | Plastic Ultrasonic Welding | Metal Ultrasonic Welding |
|---|---|---|
| Typical frequency | 20–35 kHz | 20–40 kHz (often lower for larger sections) |
| Amplitude setting | Medium–high (30–80 µm at horn) | High (40–80+ µm, very application specific) |
| Clamping force | Lower–medium, to avoid crushing and flash | High, to break oxides and forge metal-to-metal bond |
| Control mode | Energy or distance mode preferred | Almost always time mode |
| Weld time | Short, tightly controlled for cosmetics | Very short but repeatable, focused on strength |
For plastic assemblies, we usually pair optimized parameter sets with floor systems like our IQ-series ultrasonic plastic welders to keep clamp force, amplitude, and collapse distance under tight control.
Why control modes differ
- Metal: We almost always use weld-by-time because:
- Metal welds form through friction and plastic deformation, not melting.
- Stable force + time gives very repeatable weld nuggets.
- Plastic: We usually prefer energy mode or weld-by-distance because:
- Energy mode compensates for part-to-part variation in plastic parts.
- Distance (collapse) mode locks in joint penetration and weld strength.
Joint design, surface prep, and parameter shifts
- Plastics:
- Use energy directors, shear joints, or tongue-and-groove features.
- Clean but not overly polished surfaces; focus on tight fit.
- Start with moderate amplitude, moderate pressure, and tune weld-by-energy.
- Metals:
- Flat, serrated, or knurled welding areas with firm mechanical support.
- Clean, oxide-free surfaces; remove oil, paint, and heavy oxide layers.
- Use higher clamping force, higher amplitude, and short, controlled time.
When switching from plastics to metals on ultrasonic equipment:
- Increase clamping force significantly.
- Increase amplitude, then back off until you stop seeing surface damage.
- Shorten weld time, then step it up until target pull/shear values are reached.
For production of busbars, tabs, and terminals, we lock in these higher-force, time-based settings on our M-series ultrasonic metal welders to keep the process stable shift after shift.
Advanced Ultrasonic Welding Parameter Tips
Real-world tricks for tighter weld control
When you’re running production, How To Choose Ultrasonic Welding Parameters is less about theory and more about how the process behaves shift after shift. Here’s how I tune advanced settings on our HYUSONIC systems to keep welds stable and cosmetic:
Use dynamic trigger to absorb part tolerance and flash
- Set a trigger force band instead of one fixed value (for example, 25–40% of weld force).
- If parts vary in height or have flash, allow the machine to trigger either by force or by a low pre-trigger power so ultrasonics start consistently at the first real contact.
- Watch the trigger distance trend; if it drifts, your molding or stamping process is moving.
Know when to switch from time mode to distance control
- Stay in simple time mode only when parts and materials are very consistent and weld strength is not safety-critical.
- Move to absolute distance when you care about final stack height and cosmetic fit.
- Use collapse distance (weld-by-distance) when weld strength and internal bond are critical; it compensates for part-to-part height variation better than time or energy alone.
Protect thin-wall and cosmetic parts with pre-trigger and stepped amplitude
- Turn on pre-trigger so the horn is already vibrating at low power before it touches the part, reducing impact marks.
- Start with a lower amplitude setting (for example 40–60%), then ramp to the full amplitude over a few tens of milliseconds once collapse begins.
- For delicate ribs or thin walls, combine low start amplitude with a slower downspeed so the horn “settles” instead of punching the part.
Cut horn marks with pulse-width modulation (PWM)
- Modern HYUSONIC generators can use PWM to modulate power without changing frequency; this is one of the most effective ways I know to reduce horn burn and whitening.
- Dial in a slightly lower peak amplitude and let PWM deliver the energy over a longer time to keep surface temperatures under control while still hitting target weld strength.
- Pair PWM with a well-matched horn and a stable ultrasonic booster so the delivered amplitude at the joint stays predictable.
Stabilize the process as tools wear and fixtures move
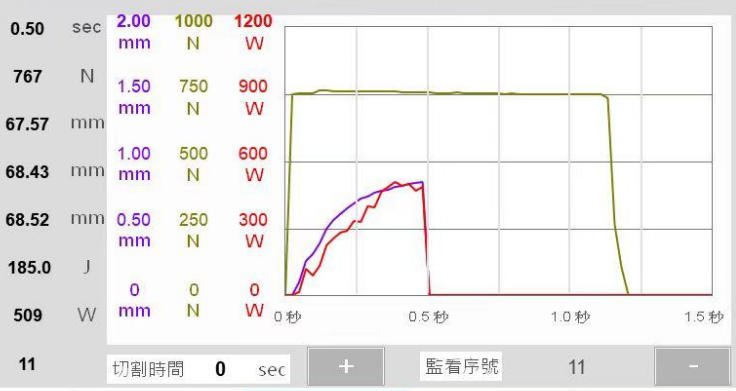
- Track key weld signatures: peak power, energy, collapse distance, and hold force. When these drift, it’s often tooling wear or fixture shift, not “mystery” parameters.
- Use energy mode or collapse distance as the primary control, and cap with max time and max power limits as safety rails.
- If you see gradual loss of amplitude, inspect and, if needed, replace ultrasonic transducers and stacks before chasing parameters on the HMI.
Document and lock in your best parameter recipes
- For every critical part, lock down: frequency, amplitude %, trigger force, weld mode (time/energy/distance), weld limits, downspeed, hold time/force, and acceptable weld signature ranges.
- Store parameter “golden recipes” by part number and revision, and restrict who can change them; require sign-off for any shift to amplitude, pressure, or weld mode.
- Run periodic verification (first-piece and changeover checks) to make sure the live parameters still match the documented recipe and your ultrasonic welding parameters chart.
Common Ultrasonic Welding Parameter Mistakes and How To Avoid Them
Even experienced teams run into weld issues because of a few repeat mistakes. Here’s how I look at ultrasonic welding troubleshooting so we lock in stable, production-ready settings.
Over-welding: Too Much Amplitude, Time, or Pressure
Pushing amplitude, weld time, or horn pressure too high overheats the joint and kills consistency. You’ll see:
- Heavy melt overflow and flash
- Burn marks or whitening
- Distorted or crushed parts
How to avoid it:
- Start from a conservative ultrasonic welding parameters chart, then step amplitude setting and weld time up in small increments.
- Watch collapse distance and part height; stop where strength plateaus or cosmetic issues appear.
- Reduce pressure first before cutting amplitude if you still need weld strength.
Under-welding: Not Enough Energy or Poor Coupling
Low energy, low trigger force, or poor part contact leads to:
- Non-stick or “cold” welds
- Easy manual breakage
- Incomplete energy transfer at the joint
How to avoid it:
- Raise amplitude and/or weld time in small steps and confirm with pull/shear tests.
- Increase trigger force so vibration starts only after full contact.
- Check fixtures for rocking, gaps, or loose clamps that absorb energy.
Wrong Booster Gain or Horn Amplitude
Choosing the wrong booster ratio or horn design can narrow your process window:
- Too high booster gain = tiny sweet spot, lots of over-weld risk
- Too low gain = machine runs at 100% but still weak welds
How to avoid it:
- Select booster gain and horn amplitude based on part size and material, not just “what’s on the shelf.”
- If you need extreme amplitude or very low generator percentage to get strength, re-evaluate booster/horn selection.
Ignoring Joint Design and Material Limits
You can’t “parameter-fix” a bad joint. If the energy director, wall thickness, or fit-up is wrong, the process will be unstable:
- Random leaks
- Inconsistent collapse
- Big variation lot-to-lot
How to avoid it:
- Validate that the material and joint type are actually suitable for ultrasonics using resources like our guide on what materials can be ultrasonically welded.
- Confirm part fit and flatness before chasing parameter changes.
Trusting Only Visual Appearance
A weld that looks perfect can still be weak inside. Relying on cosmetics alone is a common U.S. shop-floor shortcut that backfires in the field.
How to avoid it:
- Always pair visual checks with strength testing (pull/shear) and periodic cross-sections.
- Use weld-by-energy or weld-by-distance to stabilize internal bonding, not just surface melt.
Using One Parameter Set for Every Material or Machine
Running the same settings across PP, ABS, PC, different colors, or different ultrasonic machines is a fast way to lose control:
- Colorants, fillers, and resin families absorb energy differently.
- Different generators and horns deliver different real amplitudes.
How to avoid it:
- Treat each material and machine combo as its own process.
- Use a simple ultrasonic welding troubleshooting guide and DOE to re-center amplitude, weld time vs pressure, and trigger force for each setup.
Poor Parameter Control and Equipment Maintenance
Even a great setup drifts if you don’t control it:
- No record of final parameter sets or limits
- No change history when operators “tweak”
- Wear on horns, boosters, and fixtures that quietly shifts actual amplitude and horn pressure
How to avoid it:
- Lock down recipes with clear upper/lower limits and change authorization.
- Schedule regular tool inspection and preventive maintenance so effective ultrasonic weld strength factors stay inside your proven window.
- Periodically re-verify key parameters (amplitude at the horn face, trigger force, downspeed and hold time) with a short capability check.
When we set up a new line, we build these controls in from day one. It’s the simplest way to optimize the ultrasonic welding process and avoid expensive surprises in the field.
Ultrasonic Welding Parameter Calculator and DOE Template
When you’re serious about How To Choose Ultrasonic Welding Parameters, a smart calculator plus a solid DOE template takes the guesswork out of setup.
What our HYUSONIC calculator needs:
- Material and joint type (e.g., energy director, shear joint, battery tab)
- Ultrasonic frequency (15, 20, 30, 35, or 40 kHz)
- Target weld strength and part thickness
- Machine limits for amplitude, weld time/energy, and horn pressure
What the calculator gives you:
- Starting amplitude setting at the horn (µm and %)
- Initial weld time / energy and horn pressure ranges
- Recommended trigger force and basic downspeed/hold time
How you use the DOE template:
- Drop these starting values into a 3×3 DOE (amplitude, time/energy, pressure)
- Run parts, record weld strength, and note defects
- Use the results to define nominal parameters and clear upper/lower control limits
Our HYUSONIC-branded ultrasonic welding parameters chart, calculator, and DOE template cut setup time, lock in repeatability, and simplify documentation for audits. Once you have a stable window, you can focus on optimizing cycle time and quality, not chasing settings. For broader context on process capability, see our breakdown of the advantages and disadvantages of ultrasonic welding.
FAQ: Ultrasonic Welding Parameters
I get these questions all the time from US customers setting up new lines. Here are direct, practical answers you can use on the floor today when you’re figuring out How To Choose Ultrasonic Welding Parameters.
What is the most important ultrasonic welding parameter?
For most plastic and many metal applications, amplitude is the #1 parameter.
- Amplitude drives melt rate, interface temperature, and bond strength.
- If amplitude is wrong, no amount of tweaking time or pressure will fully fix the weld.
- Once amplitude is in the right window, you fine‑tune weld time/energy, force, and hold conditions.
How do I convert amplitude % to microns at the horn?
Use this simple formula:
Actual amplitude (µm) = Stack rating (µm) × Booster gain × Horn gain × Generator %
Example:
| Item | Value |
|---|---|
| Stack rating (at 100%) | 40 µm |
| Booster gain | 2.0 |
| Horn gain | 1.5 |
| Generator setting | 50% |
| Delivered amplitude at horn | 40×2×1.5×0.5 = 60 µm |
This is the real amplitude setting in ultrasonic welding, not just the % on the screen.
Can I use the same settings for 20 kHz and 35 kHz?
Usually no.
- 20 kHz: higher amplitude, more force, good for larger or tougher parts.
- 35 kHz: lower amplitude, lower noise, better for small, delicate, or cosmetic parts.
- When changing frequency (20 kHz vs 35 kHz differences), always re‑optimize amplitude, weld time, and pressure with test runs.
What pressure/force is typical for plastic ultrasonic welding?
Actual values depend on horn size and joint area, but this is a good starting point:
| Part size (plastics) | Typical force range | Notes |
|---|---|---|
| Small (up to 1 in²) | 150–600 N (35–135 lbf) | Thin ribs, small housings |
| Medium (1–4 in²) | 400–1500 N (90–340 lbf) | Most consumer and auto components |
| Large (4+ in²) | 1200–3000 N (270–675 lbf) | Big housings, structural parts |
Set horn pressure in ultrasonic welding just high enough for solid contact, without crushing or flashing the part.
When should I switch from time mode to energy or distance mode?
Move beyond simple time mode when you need tighter control and robustness:
- Switch to energy mode vs time mode (ultrasonic) when incoming parts vary and you want consistent energy input and weld strength.
- Switch to weld-by-distance (absolute or collapse) when joint height and melt‑down control are critical (seals, cosmetic joints, precision fits).
- High‑volume, safety‑critical, or automotive programs in the US almost always end up in energy or distance mode once they’re stable.
If you want a deeper foundation on how plastics respond to these parameter changes, I recommend reviewing the principles of ultrasonic welding of plastics that we follow in our systems: ultrasonic welding of plastics basics.